 A Halibut is a bottom fish. Over the years it has evolved such that both eyes are on the same side of it's body. That's a handy arrangement for anything that spends most of it's time on the bottom looking up. Smart Halibut.
The Made With Magic components that we'll explore in this post might be considered 'Halibuts', too - in that all their LEDs are on the same 'side' and facing in approximately the same direction. The items I'm referring to are the components taken from: the Headband, the World of Color Sipper and the Mickey Glove, as shown below.
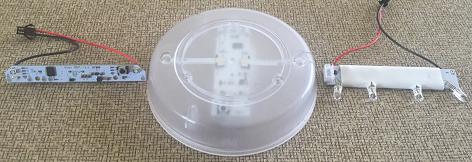
Unlike the previous post wherein the Wand and the Paintbrush didn't need any fiddling with to make them work, you'll need to get rowdy with these items and do a little tearing apart. Follow the links to those devices to see what's involved in there extraction. For the World of Color Sipper base, restoring to close to it's original state is easy. The Headband can be put back together if you don't mind some light soldering and are handy with sewing. However, for the Glove, they'll be no turning back. It's good to keep that in mind when contemplating some of these hacks.
World of Color Sipper base and 14" - 16" lanterns
Once you've torn off the labels and used your screw driver to release the base unit, it's time to figure out how to use it in a lantern. The base unit measures 4.5" across. Ideally, we find a lantern with a top opening at least that big so we can slide the base unit inside and not have to go with mounting it above or below the lantern. Both the 14" and 16" lanterns I bought have top opening a bit larger than 5", so both of those work. At the 12" lantern size, the opening is only 4.25" - just barely too small to work.
...testing uplighting
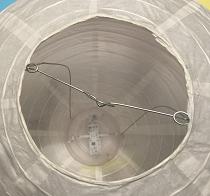 To illuminate the entire lantern with a unit that has LEDs all in the same plane, we're pretty much limited to either uplighting from the bottom of the lantern or downlighting from the top. If we are to be true to the 'Halibut' theme, uplighting should be tried first. Uplighting with this unit is dead simple. You simply turn the device on and place it in the bottom of the lantern facing upwards. The wire frame that holds the lantern's shape comes together much closer at that bottom than at the top. Consequently, the base won't fit nicely at the center of the bottom opening. It has to go a bit to one side or the other.
The video below shows what this looks like in action. Both lanterns are responding to the same MWM signals to facilitate comparisons. On the left, is a lantern illuminated by a Wand, a device that uses two 5mm clear RGB leds. The WOC uplit lantern, which runs four surface mounted RGB LEDs, is on the right. Both lanterns are 16" and taken from the same batch.
It's clear that the WOC base unit gives brighter colors than the Wand when compared using the same sized lanterns. The 'warm' spot on the bottom is very noticeable, as is the projection of light onto the ceiling. I don't prefer either. You may also discern the slight differences in color hues emitted by the different types of LEDs. That discrepancy was discussed in a previous post.
... switching to downlighting
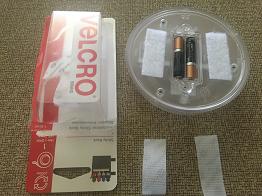
Sorry Halibuts, but if uplighting doesn't give optimal results, the alternative is to hang the unit from the top support and downlight the lantern. To begin with, the hook on the bottom of the top support frame needs to be snipped off with wire cutters so the WOC base can lie flat against that top frame wire. Then we need a means to fasten the WOC base to the upper support wire. In a pinch, I've used packing tape and it works OK, except it needs to be removed each time the batteries need changing. That gets old quickly.
The best option I've come up with is to use Velcro strips. 2" strips of sticky-back Velcro were cut and the soft, fuzzy 'loop' side stuck to the bottom of the WOC base, roughly parallel with the batteries.
To attach the base to the top cross piece of the lantern frame, I attach the 'hooks' piece of Velcro to approximately half of both pieces already attached to the WOC base. Holding the base unit at a 90 degree angle to the lantern opening, the 'hooks' piece is pressed closed around the top wire and mates with the other half of the Velcro on the WOC base. Make sure the Velcro is securely fastened and let go of the base to see if it 'floats' into the correct position. If not, rotate the base up to 90 degrees again and correct the Velcro positioning until it suits you.
... the result
In this video, the left 16" lantern holds a Wand. On the right is the WOC base unit downlighting a 14" lantern. Despite being a smaller lantern in this example, the 'warm' spot that was so evident when uplighting is not remarkable this time. The colors are even more vibrant in this smaller lantern. They show up well even with substantial ambient lighting, something that's not true for the Wand in it's 16" lantern. There's still some projected light onto the ceiling, but it's not as defined as it was when uplighting was used, instead. And you'll still need to lower the lantern every 20 odd hours to replace the batteries if an alternate wiring scheme isn't resorted to.
... about that 'sticky sided' Velcro
Lots of folks have noted that the self-adhesive of these Velcro products doesn't last that long. To extend it's effectiveness, I tend to hold down the 'loop' part that's stuck to the WOC base when separating the two pieces. It does have a tendency to pull off and try to go with the upper 'hook' piece when separating the halves. The velcro/velcro bond is quite strong and the force needed to separate the pieces is sufficient to pry it away from the WOC base, even when the adhesive is brand new. So far, I haven't found this to be a problem. I'd prefer the Velcro adhesion to the WOC base be reversible in case I want to do something different with it in the future. So I'm willing to pamper the Velcro and let it be a little tempermental until it flat out stops working and I have to apply a stronger adhesive. No biggie.
... conclusions
This is an easily reversible hack that gives very nice results. The hardest part just might be getting your hands on a World of Color Sipper in the first place. They're only available at California Adventures in Anaheim. Even then, you may have to hunt around a bit to find where they're selling them. They won't be in the stores. They're a food item. Look for these in places that sell food and drink.
Downlighting seems to give the nicest effect. Looks like that's the way to go. That will be the focus for the next couple of items.
Headband and lanterns 12" - 16"
Up to this point, we've worked with components/devices wherein the circuit boards are protected and the item has it's own integrated battery compartment. From here on in, that's no longer true. We'll need to take steps to make sure the circuit board is protected and also provide a separate means of power.
... scoping out the lantern options
The Headband circuit board is a tad over 3.5" long. Measuring the openings for some of the smaller lanterns I get:
- 12" opening = 4-4.25"
- 10" opening = 3.25"
- 8" opening = 3"
- 6" opening = 3"
Based upon those measurements, the headband components should fit nicely inside the top openings for most lanterns down to about 12" in size. Below that, the board will need to be recessed from the top and further down into the lantern to get sufficient clearance on the sides. That makes things more awkward, but it is doable for those sufficiently dedicated to make it work.
I'll stick to the 12" size for this example for a couple of reasons. A unique feature of the Headband is the switch on the back of the board. Presenting that switch at the very top of the lantern offers a convenient way to handle turning the lantern on and off. Once the board gets recessed deeper into the lantern, that switch isn't as easy to reach and it also gets in the way of efforts to mount the board on the bottom of a battery holder - which is the logical and most convenient way to recess the board deeper into the lantern. It's just not as clean below 12" and there are probably better candidates for the smaller lanterns.
... making a top support
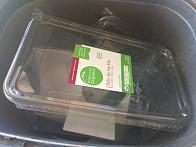 We'll need something electrically non-conductive that we can put on top of the lantern and attach to the Headband components, along with some sort of battery. After testing an assortment of possibilities, lately I've taken to raiding our recycle bin and fishing out the lids from ready-to-eat salad containers, like the one seen resting in our recycle bin in the photo on the right.
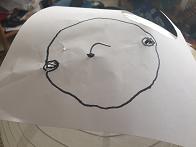 To turn that into a proper lantern top, start by taking a blank piece of paper and poking the hanging 'hook' through it and snaking the paper down the hook until it rests reasonably flat across the top of the lantern. Stick some sort of light in the bottom of the lantern so that the edges of the top opening are clearly evident through the paper. Grab a felt pen and trace the edges of the top opening. Now mark where the inner frame comes up and through those two metal retaining circles on the top perimeter.
Carefully work the paper off the hook and put some pieces of double sided tape, and/or regular tape that's been turned back on itself, on the inside of the traced lantern perimeter such that the plastic will stick to it when lowered onto the paper. Cut off the outer edges of the salad container's top to get to the flat part. Once you have that, take it and lay it on top of the taped paper such that the two stick together. Now cut around the paper/plastic template, approximately 1/8" to 1/4" beyond the traced lines, to insure that the final product will have ample overhang to support the necessary items. Use a nail or something similar to poke a hole where the hook needs to feed through. Elongate that hole a bit to make sliping this cover back over the hook easier. Finally, make cutouts for those inner frame supports that stick up above the rim.
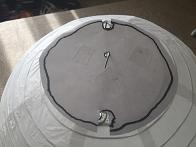 Now take your handiwork over to your lantern and see how it fits. It ought to lie reasonably flat across the top of the lantern and the cutouts on the side should prevent it from sliding around. If something isn't quite right, whittle it down until it is. When you've got it the way you want it, go ahead and remove the paper and tape. Your top is now almost ready for business. There's still the matter of a cut out for the switch and mounting the board.
...picking a battery and a connector
Placing the Headband board right at the top of the lantern limits the available power choices. Any component that hangs down even a little bit will cast a marked shadow that looks funky. Bulky AA/AAA battery holders won't cut it because of the shadow problem and also because of their weight. The Headband board will have to go on one side of the lantern's center cross-frame piece and the battery on the other. These lanterns weigh practically nothing. Slight weight imbalances cause them to list to one side and look weird. The battery has to be a light and flat as possible or the lantern will need to be powered by wires connected to an external power source.
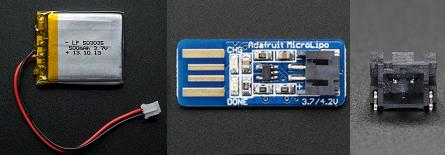 So far, the only batteries I've found that fit the bill are 3.7V, 500mAh LiPo batteries. The good news is that they are rechargeable and work well. The bad news is that they are Lithium batteries and will catch on fire if not handled properly! To prevent that from happening, you probably only want to buy batteries with overcharge protection, short circuit protection and under voltage protection and buy a charger recommended for those batteries from the same vendor. This is one item where the cheapest available is probably not the best choice! The battery you choose will determine the type of connector you'll need to add to the Headband board. I went with the 3.7V, 500mAh battery on the left, the matching charger in the center and the JST PH connector on the right. All from LadyAda. That combination has worked together very well without even a hint of any problems.
...putting it all together
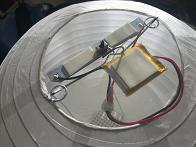 Once the power components have been squared away, finish cutting the hole in the plastic top for the Headband switch. You'll want it far enough away to clear the metal cross piece.
Solder the JST connector onto the Headband board's power wires. Mount the Headband board to the plastic top using cut pieces of Scotch Mounting Tape. Connect the battery and arrange such that there's a minimum of wires hanging down. Hold it in place with another piece of Mounting Tape. To make sure the wires lay flat against the top, I usually tape them down with some regular Scotch tape.
If you put the top on the lantern, as is, it will give a funny looking little platform floating on top of the opening. You can make it hug the opening a little tighter by moving to the edge furthest away from where the wire support frame inserts into the opening eyelets and making two cuts in the plastic, each about an inch long and about an inch apart. Do the same on the opposite side of the plastic. Gently lift the top and bend the 'tab' down until it slides underneath the rim. That will pull the top down nice and tight. Do the same on the opposite side.
If getting the top over the metal hook is difficult, elongate the opening or the hook can be bent to make it easier to get the top on and off.
When it's time to recharge the battery, just take the top off, disconnect it from the Headband and plug it into the charger. You should get somewhere in the neighborhood of 20hrs runtime per charge with a 500mAh LiPo and around 50+hrs from a 1200mAh LiPo.
... the results
The 12" lantern with the Headband component we've been working with is on the far right. The one on the left is a Wand in a 16" lantern, and the middle is the World of Color base, this time in a 14" lantern. The 2 LEDs in the 12" lantern appear to give roughly the same intensity as the 4 LEDs in a 14" lantern. Both of those are quite a bit brighter than the 2 LEDs in the 16" lantern, that's something to consider if the goal is to assemble a collection of MWM enabled lanterns and you'd like even illumination from all.
The colors look comparable, too. There's a hint of a 'snake eyes' effect in the Headband lantern. If that's bothersome, it can be toned down by adding some sort of diffusion material over the LEDs.
... conclusions
The easily accessible on/off switch on top of this lantern is really nice to have. It's also great that the battery is rechargeable. Those non-rechargeable batteries tend to pile up quickly. When the room is quiet, I do notice an electronic buzzing from the Headband board that I don't remember hearing from the others. That's different.
The Headband automatically syncs reasonably well with any glove and/or Ear Hat units that may be in the vicinity. Consequently, you can get a decent 'show' by simultaneously running a couple of these compatible units together without having to resort to using a programmed transmitter to do the deed.
All in all, this hack offers a very nice alternative to an unused Headband stashed away in a closet.
The Mickey Glove and lanterns 10" - 16"
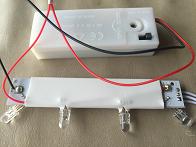
The Mickey Glove has become my favorite source of MWM components to work with. It offers so many different possibilities. Here, I'll share the lantern hacks I was able to do without resorting to a lot of board customizations.
In a future post, I'll go into some of the really cool things that can be done with this board if you aren't squeamish when it comes to wielding a solder-sucker, a soldering iron and replacing a few board components.
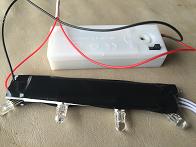
The circuit board taken from the Glove device is roughly the same length as the headband, about 3.5". So it makes sense that it should work in all the same lantern sizes as the Headband, ie down to 12". And it does. If the components were carefully extracted from the original device, the battery compartment should still be attached. To prevent shorting any of the exposed board components, covering the board with a strip of electrical tape is a good idea.
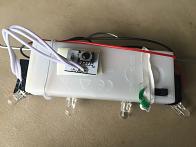
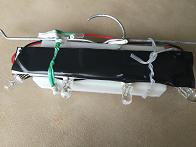
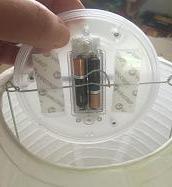
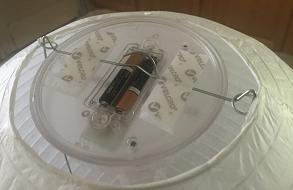
After that, it's really easy to get the components into a lantern. Pop the metal frame out from the lantern if it is already inserted. Position the battery compartment just below the 'notch' in the top cross piece such that it's resting against that lower 'hook'. On the opposite side of the battery compartment from that lower 'hook' is where you'll want to attach the Glove board. You can use anything handy to hold the two together and 'hang' the assembly from that wire cross piece. In the photos you'll see that I used twist ties I found on the kitchen counter. I'm sure there are better options.
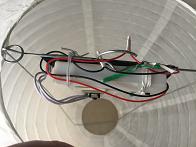 As shown in the photo above on the left, the infrared receiver may be attached to the switch side of the battery compartment with a piece of Scotch Mounting Tape. All wires need to stay above the LEDs to avoid casting shadows when inside the lanterns. Wrap them around the assembly to keep them out of the way. The photo to the right, which is looking down on the assembly mounted on the top frame of a lantern, shows one way this might be done.
To change the batteries, the easiest way is to pop the frame out from inside the lantern and lay it on the Glove board side. At least one of the ties will need to be removed to get into the battery compartment.
...results
To begin with, the Glove components were installed into a 16" lantern and hung along side another 16" lantern with the WOC base inside to compare the performance of the Glove components with components taken from another device that also has 4 LEDs. The 12" lantern containing the Headband setup with it's 2 LEDs was also hung as an additional comparison. In the video, the lanterns are, from left to right: Headband 12", WOC 16", Glove 16".
The first thing you'll probably note is that the Glove components give very different results from what we've seen previously! Actually, it's kind of a striking effect, but it may not be what you had in mind. The LEDs on the Glove's board are NOT diffused. Most of the light from those red, green and blue LEDs comes straight out the tip of the LED and results in those circular patterns of the primary colors that are observed in that lantern. The LEDs in the other two lanterns ARE diffused and don't give that effect.
...adding a little diffusion
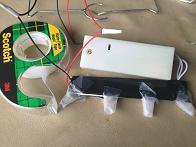 If the 1960's light-show effect isn't for you, a cheap, easy and readily reversible way to create diffusion of those LEDs is to add some layers of Scotch Matte Finish tape over them - NOT the clear tape! One layer will give a partial blending of the colors to produce yet another effect. The 'circles' disappear but the colors don't completely merge. I kind of like it. give it a try and see what you think.
Make it two layers of Matte Finish tape and the results become similar to what is put out by the other lanterns, as seen in this video. On the far left is a 16" lantern with a Glove board diffused using Scotch tape, in the middle is another 16" lantern with the WOC base inside and the one on the far right is the unmodified Glove board in it's 16" lantern, each responding to the same MWM codes.
Even after adding the tape to diffuse the light, the Glove components are still as bright, if not brighter, than the equivalent WOC output. The colors seem to be a little off in this combo. I've often witnessed that the devices with the through-hole, clear LEDs have weaker reds than the surface mount-type LEDs used in most of the other MWM devices.
... testing for smallest acceptable lantern size
Some experimenting was done to see how small of a lantern will work with the Glove components. For lanterns smaller than 12", the entire board has to be recessed down into the lantern because the opening just isn't wide enough to accommodate the length of the board. However, the battery compartment is only 2.75", which IS short enough to attach to the top cross-frame piece for all the lanterns I have, all the way down to 6". With fiddling, the Glove board can be mounted lower down on the battery compartment such that it clears the sides of the lantern.
But there are problems when sticking this board in smaller lanterns. First, 4 LEDs is a lot for such a small lantern. The outer two LEDs point off at an angle and are right up against the side of the lantern. That gives distracting 'hot spots'. Those outer LEDs can be masked off, with something like electrical tape, to tone down the amount of light and avoid hot spots on the two sides. Unfortunately, those masked LEDs then cast shadows, the result is that hot spots get swapped for shadows. The straightforward solution is to simply snip off the two outer LEDs, but this may be irreversible if you aren't handy with a soldering iron and don't have some replacement 5mm RGB LEDs laying around. However, that does work.
For my tastes, I only got acceptable results down to a 10" lantern when the outer LEDs were simply masked off. The shadowing isn't too bad and can be hidden to a certain extent by aligning them with the lantern's seams. Watch the video to see what a 10" lantern looks like with those two LEDs masked off. For comparison, we have the Headband board in a 12" lantern on the right. Because the Headband and Glove devices will sync together quite nicely on their own, the two devices were simply allowed to 'sync' with each other in this video. No additional MWM commands were sent.
The intensities are comparable ... and so are the colors! The Glove board used for this comparison is different from the one seen in the other videos above. It's possible there is some variation in the actual resistor values among the boards or maybe Disney engineers have tweaked things recently to enhance consistency. Whatever. It shows that the two types of LEDs ARE capable of producing the same colors when the circuitry allows.
... conclusions
The Mickey Glove components are another easy way to light up paper lanterns down to about size 10". Once the components are dug out, it just requires some different types of tape and some twist ties to add them to your lantern. No soldering, wire cutters, LiPo batteries, etc required. Anyone can do this.
There are also more potential effects to play with than are available with the components from other devices. The amount of diffusion can be altered to produce a variety of results.
Moving on
So far, we haven't picked on either version of the Ear Hat components nor the Chernabog stuff. I'll explore those in the next post. I refer to them as the MWM 'Yogis' due to their ability to be flexed into more shapes than most of the other MWM components. The Wand and Paintbrush are the MWM 'Possums', cuz they hang by their tails in their lanterns. The 'Halibuts' we've just gone over. Later on, we'll come around to the MWM 'Octopus' - a customized Glove board that can run up to 12 RGB LEDs.
Somewhere in there I'll also post what I've learned about powering MWM devices and some of the available options.
If you hack something up and don't mind sharing, register and then post a comment to brag about all you've done! I'm sure there are a lot of great ideas floating around out there that people would like to know about.
Others in this series
- part 1 - Lanterns + MWM's Possums: Wand and Paintbrush
- part 3 - Lanterns + MWM's Yogis: Ear Hat v1.6, Ear Hat v2.2 and Customized Glove
- part 4 - Lanterns + MWM's Octopus: Customized Glove
- part 5 - Lanterns: House-breaking - enforcing a 'code' of conduct
