Have you heard about this one?
This device seems to be like the child that no one in the family talks about. So finding information on it is difficult. It was introduced only at Walt Disney World the same time as the first set of light up pins (see other article) appeared, around 2001.
By itself it is just a basic pocket electronic game unit measuring a little less than 4.5 inches by a little less than 6 inches. It has 16 different games in it played through an LCD display on the front with no back-light. It also had sound for those games through a speaker on the back. All the games are single player. The controls are on the front.
To the left of the LCD display it has the up/down/left/right buttons in the cross pattern so familiar to Nintendo players. To the right of the display it has "A" and "B" buttons for doing different actions depending on the game. A "Sound" button that gives you three levels of volume plus a fourth option for no sound. And the final button is the On/Menu button. Pressing this button once turns on the LCD display and has the title screen of the first game during normal operation. But when you first put batteries in it, pressing this button causes the display and sound to go through the sequence you would see when a game is unlocked. (More about that in a second.)
In either case, pressing it again will bring up the menu. It takes three AAA batteries to run that are inserted in the compartment on the back. Interestingly, there is no way to turn the game off. The LCD display will shut off after a few minutes automatically.
Unlocking games in park mode
But the Moments Game has a catch. And it’s the reason it’s on this site. Only the first game of 16 is unlocked. On top of the unit, between the mouse ears, there is a window with an IR detector behind it. To unlock each of the other 15 games you had to go to 15 specific locations in the four WDW theme parks. When the game picked up the IR location code for a given area, it would unlock the corresponding game. These locations were given to you by an option on the game's menu. There, text screens you can scroll through told you each of the locations. Once you got to the location, when the unit picked up the IR signal it would play some musical notes and the LCD display shows Mickey coming out to introduce the newly unlocked game, as seen when you press the menu button after adding batteries mentioned above. Then the title screen of the new game would be displayed.
Locations didn't have to be visited in any particular order. The locations were all entrances to specific rides or attractions. It seems like the idea was that parents got the thing for their kids to keep them busy. Then the kids got a new game to play while they are waiting in line at a new ride. And the games are themed to the ride or attraction the unlocking location code was picked up at. In some ways this is like the idea of the games in the queue at today’s 7 Dwarfs Mine train ride.
Just like Mickey?
It's very likely that the IR codes received by the game’s IR detector are the same area codes used by the Pal Mickey product that came along a couple years after. So check out the upcoming Pal Mickey article on this site for possible infrared codes that might hold the keys to unlocking the respective games - if you're so inclined. Otherwise, read the instructions below for an even simpler way to unlock those additional games when not in the parks.
Unlocking the games outside the parks
The internal indicators of what games were unlocked was kept in volatile memory. The back of the battery compartment reminds you that when you change your batteries all the unlock information will be gone. But that isn't a problem because after about 7 days all games are unlocked automatically. If you can't wait that long there is a key sequence in the printed instruction manual that will automatically unlock them all as well.
Don't want to wait 7 days & don't have instructions? No problem
So if you like early retro games, you can get one off ebay. There doesn't seem to be as many offered as the pins or Pal Mickey, but there seems to always be one or two for sale. Ok, you're probably curious to ask. So if you have one without instructions, the key sequence to unlock the games is: Up Arrow, Down Arrow, Up Arrow, Down Arrow, Up Arrow, Down Arrow, while the unit display is at the first game's title screen. Viola! No microprocessor and infrared LEDs required.
Inside the Game
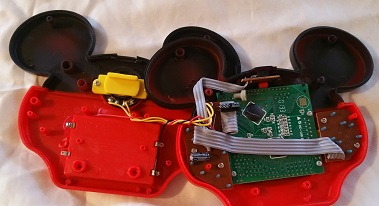
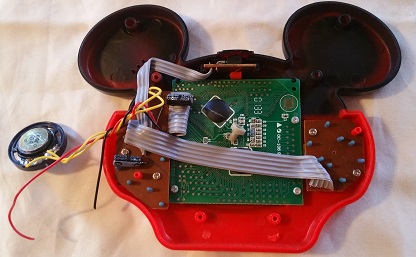
 Like the pins, dissembling the thing is very easy. On the back, two black screws at the top and two silver screws in the battery case hold the outer case together. This allows for separating the front and back halves of the case. The two pieces fit very tightly. So you might have to do some prying with a straight screw driver to get them apart. But they are not snapped in, just very tight. Remove the two screws holding the yellow tab holding the speaker on the back and cut the red and black battery wires from the battery compartment. (In the picture the red battery lead is kind of hard to see. But if you look at the upper left corner of the battery compartment, you can just see it. You can click any of the images to get a closer look.) You probably don’t need to cut the battery cables, to remove the PC boards, but I’m just destructive.
 The unit has four PC boards, two for the controls, one for the LCD display and one for the IR detector. To remove the two control boards and the LCD display just remove the screws that are holding them to the front case. You will have to look under the various ribbon cables to find them all. But they are pretty obvious. The IR detector board just slides out of the groves it is sitting in on the front case.
The last two pictures show all components removed from the front and back cases, and all the yellow buttons and gray, rubber “springs” for the buttons off to the side. In these pictures the boards have been expanded out so that their ribbon cables are fully unraveled. The first picture shows the back of the boards and the second picture shows the front of the boards. The board on the far left is the directional button controls. To its right is the speaker below and the two battery leads above that. To their right is the menu, sound and A/B button controls. And below it is they IR detector. The last board is obviously the LCD display.

So when you remove all this, what do we learn? Pretty much nothing. Like the pins and the other products in this line, at this time, all the interesting components are sealed in black potting plastic. But it is an interesting little historic note on the development of Disney’s IR product line as a whole, and an equally interesting precursor to Pal Mickey.
