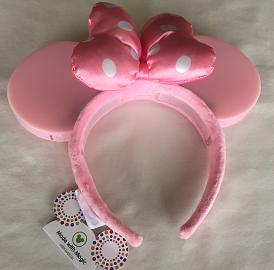
 The Headband item has been reimagined! That's good news. The previous version was a bit uncomfortable to wear and the pink material encasing the Made With Magic components distorted many colors and often missed command signals. Turning the device on and off was inconvenient as it required undoing a velcro strap and fishing around for the switch. The design was due for an upgrade! And upgrade they did.
In this article, I'll share what I've learned from my very brief investigation into this new item.
Design
A quick visual inspection concludes this item is very different from it's predecessor. The 'bow' structure has given way to two pink Mickey Ears. Guess they just couldn't resist colorizing those ears! Dang. Anyway, probably improves the appeal to those of the female gender. They seem to have adopted this new offering.
Like the newer Ear Hats, the on/off button is now conveniently located on the underside of right ear. And, also like the newer Ear Hats, the batteries are now housed directly under each ear. This allows for the sleaker design of this new headband.
The token 'bow' is simply sewn onto the soft, fluffy pink fabric that surrounds the hard plastic headband. The pink fabric makes that rigid plastic a bit more comfortable.
Materials
The materials listed are:
Surface material - Satin, ABS Plastic Polyester
Stuffing material - Polyester batting, Polyethylene foam
Two AAA batteries.
Disassembly
 The ear-battery setup for this device resembles the setup in the new Ear Hats. If anything, it appears to be a bit sleaker. Unlike the Ear Hat arrangement, the inner battery holder is straight and smooth. Seemed like it might be easier to get this one out in one piece without having to destroy the whole thing.
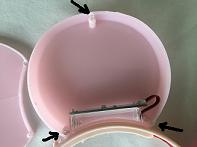 Next, it was time to open up the ears and take a peak at the topside of the MWM setup. This led to the discovery of just how different these ears are from the Ear Hat equivalents. They were a devil to get open. When I finally did, it was because I'd broken them. Instead of the flexible hooks that hold the other ears together, these appear to have three attachment points that are a snap in variety and, in this instance, appear to have been glued together, hence the difficulty getting them apart. This is probably bad news for anyone hoping to add anything to the inner surface of the ears. Those inner decals, stencils, etc are probably not going to work for this device or maybe as a one time addition and then glue the ears back together. The main point is that this is a departure from how the ears have worked up to this point. It remains to be seen if the future Ear Hats will adopt a similar strategy.
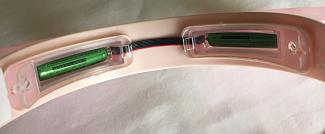 Removing the fleecy headband covering revealed the wiring connections between the batteries. Unlike the Ear Hats, the wiring stays on the underside and, therefore, doesn't require the connector used by the Ear Hats. Cleaner and simpler, but doesn't allow for much fiddling without cutting the wires and inserting additions.
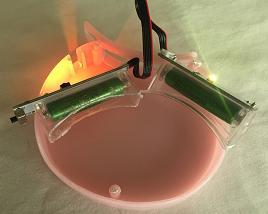 After inspecting both ear assemblies, I was convinced that the board/battery units should be removable if the glue holding them to the bottom supports could be dealt with. And, after much reckless and completely unsafe prying with a number of sharp utensils, I was able to loosen those components and pry open the slot sufficiently to pull the boards through. That's a feat I wasn't able to manage when wrestling with the Ear Hats. No desoldering involved to extract these MWM components. That could be a big plus. Square off the bottoms of the battery holders and you would have a complete MWM base to include in your hacks. But do be careful when working with those connecting wires. I've found them to be touchy and fragile. Neither my extracted Ear Hat components nor this extracted Headband assembly work anymore. I'll need to redo the wiring to get them going again - if even possible. So handle these extracted items gently and infrequently to prolong their useful lives once outside their intended homes.
Electronics
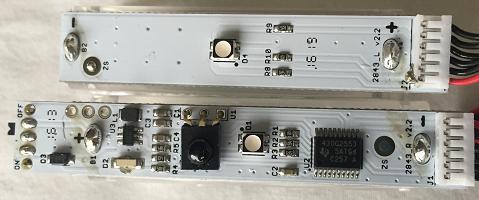 Obviously, this arrangement is nothing like it's predecessor. We now have two boards, instead of one. The layout isn't exactly the same as used with the new Ear Hats.
One departure is the use of a three-pin, through-hole IR receiver instead of the usual pan-head, surface mounted item seen in virtually all the previous MWM devices. Interesting. That would certainly make it easier to attach some hook probes and send serial commands from a separate processor. The spacing of those pan-head receivers is tighter and harder to work with!
Clicking the image to get a larger version, you can see that the processor remains the TI 430G2553. The only mysterious items are the two ZS items, one on each board.
The wiring wasn't investigated. I'm assuming it's the same as worked out for the Ear Hats. If the need arises later, I'll circle back around to mapping these out.
Stored Codes
The following codes have been detected by the device running in stand-alone demo mode:
99 42 00 00 48 00 0C XX D0 0E 80 CHK
99 42 00 00 48 00 0C XX D0 0E 95 CHK
99 42 00 00 48 00 0C XX D0 0E 98 CHK
99 42 00 00 48 14 0C XX D0 0E 83 CHK
99 42 00 00 48 15 0C XX D0 0E 80 CHK
99 42 00 00 48 16 0C XX D0 0E 80 CHK
99 42 00 00 48 17 0C XX D0 0E 93 CHK
99 42 00 00 48 17 0C XX D0 0E 94 CHK
99 42 00 00 48 17 0C XX D0 0E 95 CHK
99 42 00 00 48 17 0C XX D0 0E 96 CHK
99 42 00 00 48 17 0C XX D0 0E 97 CHK
99 42 00 00 48 17 0C XX D0 0E 98 CHK
99 42 00 00 48 17 0C XX D0 0E 99 CHK
99 42 00 00 48 18 0C XX D0 0E 93 CHK
99 42 00 00 48 18 0C XX D0 0E 94 CHK
99 42 00 00 48 18 0C XX D0 0E 95 CHK
99 42 00 00 48 18 0C XX D0 0E 96 CHK
99 42 00 00 48 18 0C XX D0 0E 97 CHK
99 42 00 00 48 18 0C XX D0 0E 98 CHK
99 42 00 00 48 18 0C XX D0 0E 99 CHK
99 42 00 00 48 18 0C XX D0 0E 9A CHK
99 42 00 00 48 88 0C XX D0 0E 80 CHK
As can be seen, there aren't that many different 48 XX codes utilized. However, there are a lot of D0 0E XX variants. More than seen in previous devices.
Hacks
- None known of so far. None planned on this end.
Purchasing options
- In the Parks! - This is the most fun option. If you have an Annual Pass, try to buy one inside a store instead of the kiosk to get a Passholder's discount. Most of the Parks are now carrying this item.
- From the Disney Store - You don't really need to be in a park to get one of these if you want one.
- Shop Parks App - You may find more products offered through the app than are advertised in the Store
