Lanterns and "Rivers of Light"
One feature of Animal Kingdom's new upcoming "Rivers of Light" night time show will be lanterns. Check out the video below to get an idea of what's in store. Lots of lanterns. It's a great idea and one that is particularly well suited for reimagining some of our Made With Magic items!
There's been no talk of this new show synchronizing with Made With Magic merchandise. Hard to imagine that they wouldn't be promoting it if initial plans included incorporating it into the show. Probably a feature they'll bring in at some later date. I also could easily imagine some 'official' Made With Magic lantern merchandise item showing up on carts and kiosks in the not-too-distant future.
Paper Lanterns
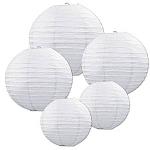
 Until then, we don't have to wait to see what Disney has in store for us in the future. We can begin reimagining right now and make our own lantern hacks. Hanging paper lanterns of all sizes and shapes are readily available, inexpensive and have the added benefit of being excellent light diffusers. Being lightweight, they're convenient to hang and are a popular decorating accessory that will fit in well with most decors. And, when you've had enough, they fold up nicely for storage until the next time you want to enjoy them again. Very convenient.
MWM devices for the paper lantern hacks
Inspired by the upcoming Rivers of Light show, I've been rabidly exploring how to incorporate Made With Magic tech into my own paper lanterns and solving some of my initial questions:
- Which devices are best suited for incorporation into lanterns?
- What size and shape of lanterns works best?
- Hanging, standing or totable?
- What's the best way to power the final products to best suit the intended purpose and/or event?
I've had some time to do a little work on this concept. Measurements have been taken. Lanterns have been purchased. Combinations of lanterns with Made With Magic devices and components have been tried. As a result, I think I now can provide some clues that will give a head start for any of you folks who also might want to jump in and run with this fun concept. I hope some of these findings will make your own hacks go a little smoother.
What I've discovered is that, with just a little imagination, most of the MWM devices can be made to work with this lantern motif. However, some devices are better suited for this purpose than others, and some require little or no tear down to give a nice effect. Other combos require irreversible tear down of the original device, but give back a lot more flexibility for incorporation into lanterns. I've worked through too much material to cover in a single post, so I'll break it up into a couple posts, starting with the easiest hacks and progressing to the more involved ones.
Magic Wand + 16" lantern

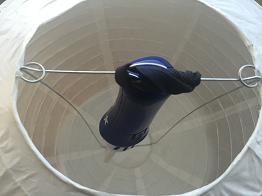
The first of the Made With Magic devices selected to try was the Magic Wand. It seemed like it might be one of the easiest to incorporate and should work well. A particularly attractive feature of the Wand is it's large 'glow' surface that diffuses light very nicely along it's entire length. It uses AA batteries which should give it a longer runtime than the AAA batteries used in most of the other MWM devices. And the device includes a lanyard that can be used to attach it to the top of the lantern so it hangs securely inside. Lots to like about this option.
 The first order of business was to estimate the size of lantern that might work best. The Wand is about 12" long. So the lantern has to be AT LEAST that large. The non-glowing handle is about 3.5". For there to be equal non-glowing spaces at both the top and bottom of the lantern, that comes to 12" for the device + an additional 3.5" space at the bottom, for a combined total length of 15.5". Searching online to see what lantern sizes are available for sale, I found that 16" is a pretty common lantern size. I figured that ought to work.
And now that I've gotten ahold of some lanterns and been able to test it out, I can verify that it does work very nicely! I used 3M's damage-free hangers (2#) and some fishing wire (10#) to complete the hack and hang some lanterns!
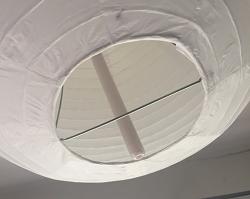
 What about smaller sized lanterns? Since the Wand is only 12" long, shouldn't a 14" lantern also work? The short answer is: not as well. I'm finding that many of these lanterns aren't actually as tall as they are wide. You don't get the full expected height to work with. Consequently, the tip of the Wand hangs all the way down to the bottom opening of the 14" lantern, or maybe even a tad below it, making it clearly visible when in action. That didn't give as 'clean' of a look as was seen with the 16" lantern. Kind of bugs me. Check out the image to the right to see what I'm talking about.
My preference is to skip the 14" size for use with the Wand and stick with the 16" lanterns. They're plentiful and usually as cheap, or sometimes even cheaper, than the 14" offerings. And some of the more ornate lanterns I've seen that are out there for sale are often only available in the 16" size.
Paintbrush + 16" lantern
If the Wand can be slipped inside one of these larger lanterns, then the Paintbrush should be able to as well. The Paintbrush is actually shorter than the Wand, overall length is only 10", so the first thought was that it may work in smaller lanterns. However, the non-glowing handle is longer than with the Wand, it's 7" long, and the glowing portion is much shorter. To center the glow portion of the Paintbrush we need 7" for the handle, 3" for the glowing tip and then another 7" space on the bottom for a total of 17" - more than is needed for the Wand and won't center in a 16" lantern.
Trying it out, it turns out to be true. The center of the light emission from the Paintbrush is noticeably lower than center of the 16" lantern. It's not a deal breaker. It still looks pretty good. It becomes less noticeable once the lantern is hung above eye level. Still, it's not as clean looking.
One thing I noticed when the lanterns that contained the Wand and Paintbrush were hung side by side is that some of the colors from the Wand are a bit wonky. Particularly, the yellows and whites tend to have a greenish tint that isn't seen with the Paintbrush. No doubt, this is due to the different types of LEDs used in the two devices.
Wand or Paintbrush?
So which of the two devices is the better choice when it comes to lighting up a 16" lantern? I guess it comes down to whichever one you already own or can buy for the best price. There's pros and cons associated with each.
The Wand best 'fits' the 16" lantern size, gives a more even illumination and runs off AA batteries that won't need to be changed as often as the AAA bats in the Paintbrush.
On the other hand, the colors produced by the Paintbrush appear to be truer than those put out by the Wand. If green-tinged yellows are going to be annoying, then the Paintbrush is likely the better choice. Check out the video below to compare a lantern with the Wand on the left and one with a Paintbrush on the right. You may be able to make out the slight differences in color and the relative positions of the respective 'warm' spots. See which one works best for you.
Additional notes
This is an easy and inexpensive hack that gives pleasing results. Once the lanterns, wire, and hangers are obtained, it goes together almost instantly and looks great. There are lots of lanterns to choose from. There are plain white laterns and others with artwork and still others with all sorts of things pasted/attached in various ways. Lots of different looks available. Some of the artwork I've seen includes: dragons, various tree blossoms, bamboo, seasonal themes, such as jack-o-lantern faces, etc. Google the subject and see for yourself.
A fresh set of batteries will provide a full day or two of enjoyment. It's a very nice effect for occasional use. But ...
...about extended use
For more extended usage, there are a few things to know about and take into consideration. The lantern will probably have to be lowered each time it's turned on/off and to change the batteries. You'll want to setup the wire hangers to make that process as easy as possible so there's no need to climb up and down each time the deed needs to be done.
The devices have a tendency to shut themselves off after running for 5 hours or so if they don't receive any MWM signals before then. Grouping a couple of MWM items fairly close together can get around this problem. If that's not possible and/or desireable, then automatic shutdowns may increase the number of required manipulations and may happen at inopportune times. Seen it happen.
The pile of dead batteries will grow rapidly if rechargeables aren't used, instead, or the setup isn't wired to an appropriate DC power source. Once the location for the lantern becomes fixed, wiring to a DC power source becomes the most convenient thing to do. Options for powering your creations will be the topic of an upcoming post.
The Wand/Paintbrush doesn't cycle through a variety of different light sequences like most of the other Made With Magic devices do. Consequently, it will happily display the same effect with the same colors for hours. That becomes monotonous rather quickly. You can get it to display a different effect by sending commands from another Wand or Paintbrush. However, that only lasts for about 2 minutes before reverting back to the original effect. So, the requests for a new effect need to be repeated often. If done manually, this becomes tedious.
For the most satisfactory long-term use, incorporating some sort of programmable Made With Magic code transmitter becomes necessary. Typically, this would involve a microprocessor, such as an Arduino, with an attached infrared LED and some software to make the magic happen. Using such a setup, you can program the lantern to display your favorite sequences or simply send the 91 40 A0 B7 command to cause the Wand/Paintbrush to cycle through it's stored patterns until you find one to your liking. If you want a particular effect to last more than a minute or two, including the command D0 05 FF will hold the effect until the next command is received or the device is power cycled.
I find many of the stored effects in the MWM devices to be too 'busy' for everyday enjoyment. Some are downright obnoxious. So it's nice to be able to take control and calm things down a bit. Since setting up a transmitter to control the displayed effects, I tend to leave the lanterns running longer than I used to and enjoy them more. It can make a big difference. But, really, this topic is one for a more detailed discussion in a future post.
The LEDs in the Wand/Paintbrush are so close together and then immediately diffused by it's white plastic casing that it's not really possible to discern left/right lighting effects. Throw in additional diffusion created by the lantern, itself, and the color effects really tend to merge together. Consequently, the codes that cause the same effects in both ears are likely to be the most suitable ones to use for controlling these devices in lanterns.
Despite there being a few drawbacks, the final effects are certainly appealing and a bit mesmerizing. It's a hack I'm glad I pursued. After adding infrared control to the lighting effects, I've come to really like this Wand-lantern combination and I think my Wand has found a new away-from-the-parks home.
No doubt, that will put my poor Wand's mind at ease, knowing that I don't intend to filet it and rip out it's guts like I've done to so many of it's cousins. It's a dangerous and uncertain life for Made With Magic devices in our household. Regular little shop of horrors.
In the upcoming posts, I'll confess to what has become of some other, less fortunate devices after the fabrics have been unceremoniously torn, wires severed, components ripped from their happy homes, PCBs burned with molten solder and the remains concealed within an assortment of lanterns hung up high where the sordid details aren't accessible to prying eyes. Stay tuned for all the gory details.
Others in this series
- part 2 - Lanterns + MWM's Halibuts: Headband, Glove and WOC Sipper
- part 3 - Lanterns + MWM's Yogis: Ear Hat v1.6, Ear Hat v2.2 and Customized Glove
- part 4 - Lanterns + MWM's Octopus: Customized Glove
- part 5 - Lanterns: House-breaking - enforcing a 'code' of conduct
