Yogis
 Yogis are into flexibility. That's also true for the components we'll look at in this post. Each of these components offers much more flexibility for placement of the LEDs than has been true for the components utilized in the previous posts. This presents some welcome new opportunities.
These components may be placed deep into the central part of the lanterns and we can orient the LEDs facing directly outwards instead of being limited to the downwards and upwards directions we had to use in previous hacks. That means we should finally be able to see some actual left/right effects and also make things work in much smaller lanterns. Some of those lanterns may be small enough that you might even be tempted to carry one with you when you return to the parks.
There is, of course, a catch. It takes a good deal of effort to become a yogi. Similarly, it takes more effort to extract the components for these hacks. You'll likely need to come up with battery holders to power the extracted boards and some soldering skills may be required. Because there is the possibility that some of the folks wanting to carry these smaller lanterns along to the parks may be kids and there is the possibility that things might get wet, dropped, smacked into, etc, LiPo batteries are NOT recommended and none of the following hacks involve them.
The first hack is the easiest. The last one is the most difficult. All the following components will work fine in lanterns down to the 6" size. That's a great size for carrying around. Should be manageable even for small kids. However, 8" lanterns seem to be easier to come by right now and you may be able to get one sooner and cheaper than a 6". But that size may be a bit much to handle for smaller folk. Some things to think about.
Where we're headed
The three lanterns on the left are the ones featured in this post. On the far left is a 6" lantern containing a modified Glove board. Second from the left is an 8" lantern with the Ear Hat v1.6 components. In the middle is an Ear Hat v2.2 setup in a 6" lantern.
For comparison, the two lanterns on the right are being down lit via a Headband board in a 12" lantern and a slightly modified Glove board in a 10" lantern on the far right. After about 10 seconds into the video, the lanterns begin to spin and you get a better idea of the differences between down-lighting and outward lighting.
8" Lantern, Ear Hat v1.6
We start with the Made With Magic components that are easiest to extract from the starting device, the older style Ear Hat, v1.6. And we'll fit those into the most readily available small lantern size - an 8", white paper lantern. So, you'll need: 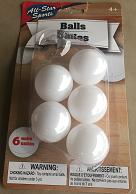
- MWM components from Ear Hat v1.6
- 8" white paper lantern
- battery holder, 2 AA or AAA, with on/off switch
- packing tape
- plastic from ready to eat salad container
- 3M mounting tape
- 1 plastic ball from Dollar Tree to use as diffuser
First off, if you haven't already done so, extract the MWM components from the correct type of Ear Hat.
Next, you'll need a battery holder. You'll want one with a switch. I used one for 2 AA batteries. That made for a very tight fit, but it did work. A two AAA battery holder would be easiest to work with. Attach the battery holder to the MWM board. Soldering is preferred, but if you don't solder and left some wire attached to the board when you removed it from the hat's battery holder, twisting the board and the battery holder wires together and using really small wire nuts might work (or, even worse, just a little electrical tape).
... make some plastic mounting flaps
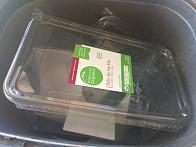 Now take a trip to your recycling bin and retrieve a suitable clear plastic container to source the 'flaps' that will be used to mount the components and battery holder. You'll want to cut two rectangular pieces. The length of those pieces will be dependent upon the width of the metal supporting frame near it's center. For my lantern that was 3".
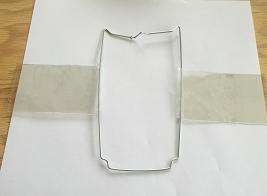 The height of the pieces will be dependent upon the distance between the bottom of the battery holder and just below either the screw that holds the battery compartment together or the switch, whichever comes first. That turned out to be 2" for this example. Once you have those pieces cut, use the packing tape to attach them to the wire frame as seen in the photo on the right. Start by wrapping the tape around the wire a couple of times before attaching it to the plastic pieces. Tape both the front and back sides of each plastic flap to the wire frame to prevent them from peeling off the frame. Even then, there's a tendency for the tape to slide up and down a bit on the frame. To keep that from happening, I added a touch of hot glue at the top and bottom where the tape and frame meet.
... attach the battery holder
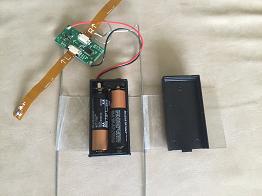
Go ahead and fold the left plastic flap over the center of the wire frame. Now figure out where the battery compartment should be attached to the flaps. There's two things you'll want to make sure of: 1) the switch isn't covered by the flap 2) the screw in the lid of the battery holder isn't covered as you'll eventually need to change the batteries and will want that to go as smoothly as possible without requiring a lot of disassembly. Check the photo below. Plenty of clearance for the switch towards the top of the battery holder.
Once you have the alignment figured out, leave the cover on the battery holder and apply generous strips of mounting tape to both the cover and backside of the holder. Place the main part of the holder on the folded over left flap. Now you can simply fold the right flap over the cover and stick it in place. This is a good time to test and make sure that you can open and close the battery holder, as demonstrated in the photo.
... position the LEDs
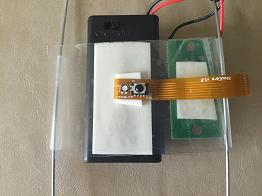 Next, it's time to position the MWM board and LEDs. Here, I simply added some mounting tape to the back side of the board and stuck it next to the main part of the battery holder. Depending upon how much room there is, it may have to be placed at an angle so it doesn't stick out beyond the metal frame - or there will be trouble when it comes time to insert this assembly into the lantern. Bend the LED strap that's closest to the frame around the frame and tack the LED in position using another small chunk of mounting tape. In that photo, it's the right LED that has been brought around.
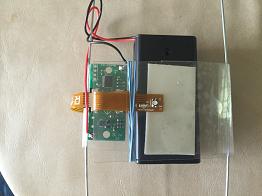 Now, flip the whole thing over so we can position the remaining LED. There's a problem with this side. The strap needs to snake around the edge of the flap so the LED may be positioned in the center of that flap. However, we're going to want that flap to open later so we can replace the batteries. It's a bit of a kludge, but what I did was to slip a rubber band around the flap and slide it all the way down to the edge of the battery holder. It's that blue band in the photo. Then the strap was fed under the rubber band to hold the LED approximately in place. Not elegant, but seems to work well enough.
At this point, you could call it quits and begin the yoga of fitting the whole assembly into the lantern. You'd get results similar to what was seen in the first video. However, you may have noticed that both, the 8" lantern with the Ear Hat v1.6 components and the Ear Hat v2.2 components in the 6" lantern, had very noticeable dark bands between the two LEDs. Reflected light from the white paper of the lantern isn't sufficient to back fill those voids.
... add some diffusers
Fortunately, as shown in this video, there's a cheap and easy way to improve the performance using the 'balls' from Dollar Tree that were shown in the photo at the beginning of this hack. They measure approximately 1 1/2" in diameter and are much thinner than the ping pong balls they resemble. Perfect for use as diffusers. And, as the video demonstrates (left to right: modified Glove 6" lantern, Ear Hat v2.2 , 6" lantern, Ear Hat v1.6, 8" lantern), they do a great job, even with the larger 8" lantern with it's LEDs separated a bit further due to the larger battery holder! Highly recommended.
First job is to cut the balls in half. They're very flimsy and easy to crush. I found the easiest way to do the deed is to make a small starter hole using something with a sharp tip. The hole just needs to be big enough to let in scissor tips. Then the scissors easily finish the job.
Each half of the 'ball' is placed over the LED on the plastic flaps and secured in place using a little hot glue on the half of the ball farthest away from the LED strap. I found I still need that rubber band to hold the LED in place on the flap that's attached to the battery cover. Adding the diffuser isn't sufficient to hold that LED in place.
... assemble lantern
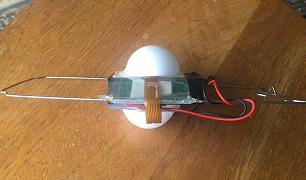 Now for the fun of carefully squeezing all that stuff into the small lantern opening. This side view gives an idea of what's in store. I added a bit of scotch tape to both sides to pull the previously unattached flap down towards the metal frame. Otherwise, it sticks out and needs to be 'pinched' down to clear the opening. The tape will need to be removed to replace the batteries but it really helps control things when inserting the assembly into the lantern.
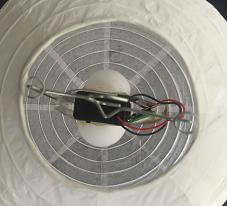 I like to start by sticking the frame in just far enough so I can grab the bottom with one hand and use that to hang the whole thing upside down. With the other hand, I slowly work the opening of the lantern over the assembled components taking special care to make sure the LED straps don't get hung up and the diffusers clear the round eyelets on the top rim of the opening. Once that's taken care of, the frame's 'horns' may be inserted into the eyelets on the lantern rim and you're in business. With any luck, it may look something like the setup shown in the photo.
Inevitably, something is going to poke through that ultra thin lantern paper and create a tear. Sometimes I'm not even sure how it happened. But it does. And when it does I currently patch the tear using Scotch Matte Finish tape, the same stuff that was used to diffuse the Glove LEDs in a previous post. It diffuses the light nicely and blends in well with the rest of the lantern. If anyone knows of a better solution, I'd love to hear it.
If the plan is to hang this lantern, then you're all set. However, if the plan is to tote this along somewhere, you'll want to add a handle.
Adding a handle
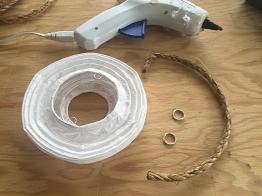 Adding a handle can be pretty straightforward. You may be able to find part of what you'll need by raiding some of your old key rings. Here's the parts list:
- 15mm split key ring works real well with,
- 10-11" of 1/4" rope/yarn. Black nylon supports an oriental motif while jute rope gives a rustic look
- hot glue
- optional: decorative string
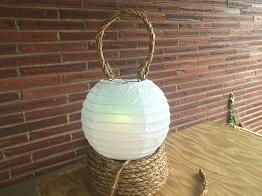 Work the key rings onto the metal eyelets on the lantern rim. Feed the rope/yarn through the key ring and double it back on itself for about 1 - 1 1/2" and hot glue it together. That ought to do it.
For a more finished look and to reinforce the hot glue, the joint could be tied and wrapped with some sort of complementary string/thread.
The 1/4" black nylon cord that I bought came with the ends wrapped with black electrical tape to keep them from fraying. So I tried just going with electrical tape instead of hot glue. It works and, as long as there is some distance from the viewer, it's not that bad. Might be a viable option for anyone preferring to skip the hot glue.
And the traditional rope clamps and/or ferrules would also work but probably would be overkill for this application.
6" Lantern, Ear Hat v2.2
The boards in the newest versions of the Ear Hats are particularly well suited for this hack. They're just a real pain to extract from those hats! But once that's done and a battery holder is secured, the rest is a relative piece of cake.
Parts list:
- MWM components from Ear Hat v2.2
- 6" white paper lantern
- battery holder, 2 AA or AAA, no switch required
- packing tape
- plastic from ready to eat salad container
- 3M mounting tape
- 1 plastic ball from Dollar Tree to use as diffuser
If you haven't already done so, extract the boards from the Ear Hat.
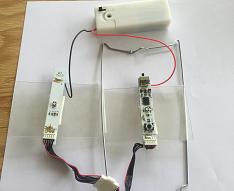 Next, you'll need to solder the battery holder leads to the boards. The proper connection points are shown in the photo.
Make and attach the plastic flaps as described in the previous example. However, this is a smaller lantern so the dimensions actually used were only 1 7/8" X 2 3/4". The photo shows the two boards mounted on the flaps using strips of mounting tape. For this example, I used the battery holder from a Glove device simply because that's what was available. The battery holder doesn't need it's own switch as there's one already on the MWM board.
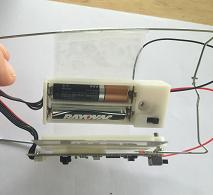 Follow the directions for attaching the battery holder to the plastic flaps that were outlined in the previous example. As shown here, be sure to check that there is ample room to access the containing screw and that the battery holder may be opened easily.
The wires that connect the two boards need to be tucked away so they don't cast shadows when working inside the lanterns. I've had luck with attaching a bit of mounting tape to the middle connector and sticking that onto the side of the battery holder. As long as the mounting tape doesn't also stick to the battery holder cover, it seems to work.
Cut the plastic ball 'diffusers' as described in the previous section. Position them over the LEDs and then hot glue the edges to the plastic flaps, but not to the MWM boards.
Here's a front and rear view of the assembly and one with the diffusers attached:
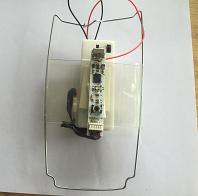
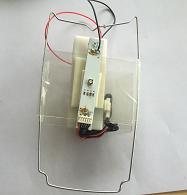
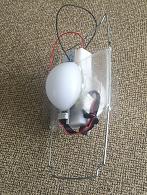
Follow the previous instructions for inserting the assembly into the lantern and if you want to add a handle, see those instructions, too. To see the final results in action, check out the middle lantern in the video in the other Ear Hat's section.
6" Lantern, Customized Glove Board
There's an awful lot to like about the customized Glove board. It's the only board that works in all the Lantern sizes from 16" down to 6". It's the only one that let's us readily choose between down lighting and out lighting. And, the last time I looked, the online price for the Glove was the cheapest of all the MWM devices. Just great. Here, we'll see how to make it work in a 6" lantern.
Parts list
- Customized Glove board with 5mm diffused RGB LEDs (2).
- 6" white paper lantern
- Glove device battery holder
- packing tape
- plastic from ready to eat salad container, or similar
- 3M mounting tape
- 1 plastic ball from Dollar Tree to use as diffuser
If you haven't done so already, extract the components from the Glove device and perform the customizations. That's the hard part, but once it's done you'll have a versatile MWM building block that can be deployed in countless ways. It's worth the effort.
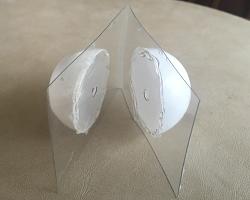 As in the previous examples, prepare the supporting plastic flaps. In this example, a single 6" X 1 7/8" strip was cut and then folded in half. The center of the folded plastic was estimated and a 3/16" hole drilled there to accommodate the 5mm LEDs. Then the plastic ball was cut in half and hot glued to the plastic flaps such that the 3/16" holes are roughly in the centers.
The leads on the LEDs were carefully bent out to about 90 degrees to allow for a flush fit with the other components. Then the LEDs were poked into the holes and the plastic cut at the fold to give two separate pieces.
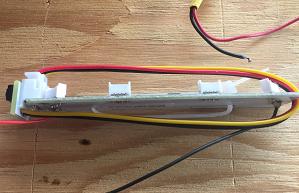 To control the wires connecting the infrared receiver to the board, they were wrapped lengthwise around the board and tacked onto the side of the IR socket using a bit of mounting tape.
The zip tie was used to slide the board onto the end of the mounting flap. It worked, but it's probably easier to just use mounting tape. Not sure it was worth fiddling with.
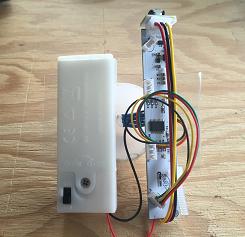 The board and battery holder are mounted onto the plastic flap. The photo shows the relative placements. Slide the battery holder up next to the edge of the LED that's poked through the flap. Then slide the Glove board over the wires attached to the LED. Plug the LED into one of the board's sockets and wind the excess wire under the wires connecting the IR receiver to get them out of the way.
Attach the other flap to the battery holder's cover, making sure that the containing screw isn't covered up. Then attach the plastic flaps to the wire frame in the same manner as for the other examples.
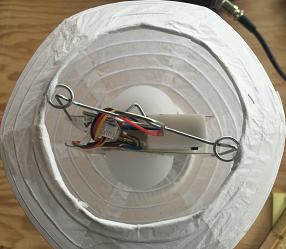 Carefully guide the assembly into lantern and insert the frame's 'horns' into the lantern's eyelets.
If you want to add a handle, follow the instructions given above.
With any luck at all, your setup should look something like the photo.
To see an example of this lantern in action, check the lantern on the far left in either of the videos above.
The only caveat concerning this implementation is that the IR receiver is sometimes visible through the bottom lantern opening. That can be remedied by changing the attachment point for the IR receiver and/or attaching the board to the supporting flap so it rides higher up into the lantern. Not a biggie.
Finishing up
The only Made With Magic device that's been completely left out, so far, is the Chernabog Sipper Cup. It could have been included in this collection as it has two very long and very flexible LED cables. But the two surface mounted LEDs on the main board pretty much require use of all 4 LEDs and would only work well in larger lanterns than explored in this post. Other factors also work against it. It probably isn't among the often purchased MWM items, so few people would be interested. One of the intrinsic demo routines is an obnoxious strobing white light, which I really don't like. And it doesn't seem to sync with any of the other MWM devices. So, pass.
 Nor were the components from either the Paintbrush or the Wand extracted and tried. For the Paintbrush, this was an easy decision. The conformation of the internal components really don't suit this application, as may be seen in the photo.
The board for the Wand is much more compact and would easily fit into smaller lanterns - at least after removing the long IR LED connectors. It could be made to work. However, the Wand doesn't cycle through a set of routines like many of the other devices do. Nor does it sync with the others. Without external input, it can become boring rather quickly - as I discovered while working with the intact device in 16" lanterns. Given a choice of starting device to draw from, I'd choose one of the other devices.
Others in this series
- part 1 - Lanterns + MWM's Possums: Wand and Paintbrush
- part 2 - Lanterns + MWM's Halibuts: Headband, Glove and WOC Sipper
- part 4 - Lanterns + MWM's Octopus: Customized Glove
- part 5 - Lanterns: House-breaking - enforcing a 'code' of conduct
